The First After

It’s finally here, folks! I’ve had these photos for a week or so, but I’ve been busy working on an office project that has kept me busy, so forgive me for neglecting my blogging “duties”.

The duplex project that I was able to record and be a part of alongside D&R Concepts is finally finished, and I can’t wait to share the transformation with you! Remember the graffiti, and all the other messes that this duplex had? You’d never guess that it was there now.

Let’s start with Unit A, which by far had the worst damage:

Entry:

20151227-thumb_DSC_4928_1024

20151227-thumb_DSC_4900_1024

Remember the stairwell that had the graffiti? Here it is now:

20151227-thumb_DSC_4906_1024

20151227-thumb_DSC_4910_1024

Isn’t it breathtaking? I’ll share the before just so you can compare:

Duplex14

Talk about transformation.

They put bamboo flooring in upstairs, and it is gorgeous:

20151227-thumb_DSC_4918_1024

20151227-thumb_DSC_4915_1024

20151227-thumb_DSC_4911_1024

Here’s the kitchen:

20151227-thumb_DSC_4899_1024

Now onto Unit B.

Although the damage to this unit was less severe, it was the one that needed the most flooring replacement, and again, the bamboo flooring in here is beautiful.

Kitchen:

20151227-thumb_DSC_4934_1024

Dining and Living room area:

20151227-thumb_DSC_4937_1024

20151227-thumb_DSC_4938_1024

Upstairs:

20151227-thumb_DSC_4959_1024

20151227-thumb_DSC_4956_1024

I’m so impressed with how these units turned out. What did you like best?

(If you’d like to see more of the before, here‘s the original post.)


How to Make a Menu Board

Hi folks! Here’s How To number Two.

This one is REALLY easy. It takes less than 10 minutes, I promise. The hardest part is getting the supplies together.

How to - Menu board 7

Before I start explaining how to put it together, let me just say that I did not come up with this idea. If you’re on Pinterest at all, then I’m quite confident that you’ve seen this before. I don’t know who came up with the idea first, but whoever did, I saw it, loved it, and decided to make my own.

The menu board that I created has caught pretty much every eye that’s come into our home. I don’t know if it’s the idea of a menu board or the item itself, but it’s definitely something that everyone has spoken favorably about. For those of us who manage to put together a weekly menu plan, it can be really helpful.

So, without further ado, here’s how to make your own.

First, get your supplies together.

How to - Menu board 2

As you see, we don’t really need much to make it. You need a frame, some wrapping paper (or you could use material) and some tape.

How to - Menu board 3

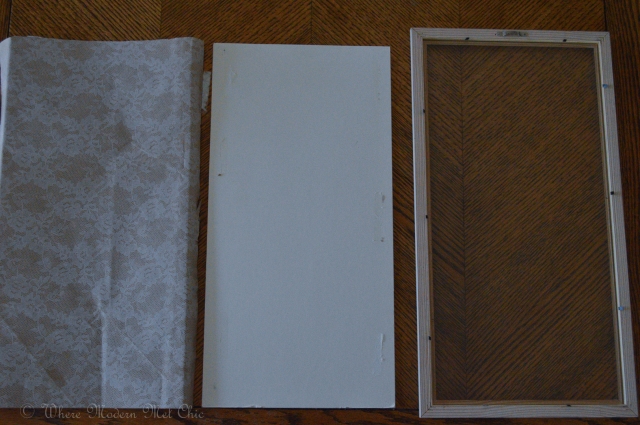
Since I took mine apart to do this post, my paper was already cut to size, so I don’t have any pictures of that.Take out the back of the frame, place it on the paper and cut, but make sure to leave at least an inch overlap on the sides so you can tape it to the board.

How to - Menu board 4

Tape the paper to the board.

How to - Menu board 5

Put the board back into the frame, and close it up.

And you’re done! See? I told you it was easy.

How to - Menu board 6

Now comes the fun part. You get to be as creative as you wish with dry erase markers on the glass. If you want the basics to be permanent (the days of the week, the words “menu” on the top, etc.) then you can draw those with permanent marker, but since I like to switch my theme up by season, I only use dry erase markers. To clean it up for a new week, simply wipe it down with a tissue or napkin, and you’re all set to go!

You can get really creative with this project, but I do have a couple words of advice. Make sure that whatever paper/fabric you use is a light color and pattern. If you’re pattern is too busy, or the color too dark, it will make the words hard to read. You might be able to get by with a bold pattern if you use white (do they make white dry erase markers? That might be fun), but otherwise, stick with a simpler pattern. Also be sure to pick a frame that will fit whatever space you intend to put the frame. Mine hangs on the wall, so it’s nice an narrow. You could also use a frame with a stand if you intend to put it on the counter. You can also use this as a shopping list instead of a menu.

Have fun!

DIY Fall Wreath

Wreaths are such an obvious sign that fall has arrived. It seems that no sooner than the leaves start to change color that you start to see wreaths magically pop up on all of your neighbors front doors.

Wreath 2

I’ve never been one to participate in this activity, the only reason being that I didn’t have a wreath hook for my door. That is no longer the case. This year, I took “the plunge” and purchased a wreath hook for our new home. Of course, I still needed a wreath to hang on it, so that was today’s project.

Wreath 1

Here are the supplies I used:

  • 12in wreath form
  • Hot glue gun and glue sticks (I ended up using about 3 sticks)
  • Cinnamon sticks
  • Acorns
  • Pinecones
  • Leaves
  • A couple wheat stalks
If you want to make the wreath even more fragrant, buy those scented pinecones and use that. I already had a bunch that I’d picked up on walks with the kids, so I used those. As for the leaves, I borrowed some from the neighbors yard. Hopefully that was ok with them.
Wreath 3
First I glued all the pinecones, acorns, and the cinnamon sticks to the wreath form. Be sure to secure them well with the glue. If you want to make them extra sturdy, you can use twist ties or florist wire to secure them. Flip the pinecones in all directions to make it look even.
Wreath 4
After that, I filled in the crevices with the leaves. If you’re door is particularly exposed, gets a lot of wind, or you simply have a habit of slamming doors and want to ensure they don’t all end up on the floor, then I recommend you gluing the leaves on as well.
That’s it! You’re all done. Go hang it up on the door and enjoy the beautiful creation you just made.
Wreath 5

DIY Bed Skirt

I’ve always had a thing for bed skirts. They’re just so, well, pretty! Our bed has remained bed-skirt-less up until now, simply because I haven’t found one that I liked enough to put on, but it may not be for much longer, after seeing this easy DIY by A Beautiful Mess:

easy and inexpensive velcro bedskirt tutorial

How darling is that? And it seems as though fringe is having it’s moment again. But you know what? I’m perfectly fine with that.

Find the whole how-to here.


P.S. I love the rug and headboard in this room too.